


Google Sheets gives you plenty of flexibility when preparing a spreadsheet for printing, whether you’re working with tables generated by Bard, customer records, or financial data. You can print the entire workbook, the active sheet, or only a specific range of cells. It also provides various options for adjusting the page layout, scaling, margins, and formatting to suit your needs.
These printing features are available in both the browser and mobile versions of Google Sheets. In this guide, we’ll explain how to set a print area in Google Sheets and cover some common questions you may have along the way.
Before Getting Started
Before following the steps below, open the Google Sheet in your web browser or the Google Sheets mobile app and make sure you have the necessary permissions to print. If you have only Viewer or Commenter access, you may be unable to print, download, or copy the spreadsheet because the owner or an editor can restrict these options. For more information about sharing permissions, refer to Google’s guidance on sharing Docs, Sheets, and Slides.
How to Set the Print Area in Google Sheets
To access the print settings in Google Sheets, open your spreadsheet in a desktop web browser and select File > Print. The available print options will appear after you select the Print command, rather than before it.
This process is different from Google Docs and Google Slides, which include a dedicated File > Page setup option. Google Drawings also uses a different workflow through File > Print settings and preview.
Adjust Google Sheets Print Settings in a Browser
When using Google Sheets in a desktop browser such as Chrome, Firefox, or Safari, you can customize several printing options before sending your spreadsheet to the printer. Follow these steps to adjust the print settings:
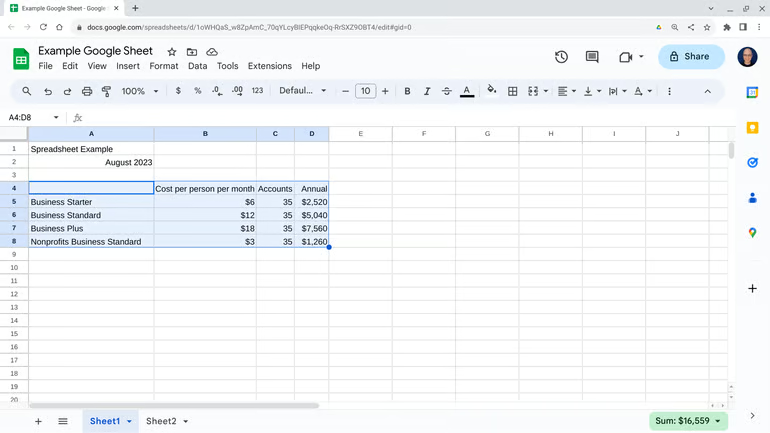
- Select the cells you want to print. If you only need to print a specific section of your spreadsheet, click and hold the first cell in the desired area, then drag the cursor across the adjacent cells until the entire range is highlighted (Figure A).
Figure A
Note: If you want to print the entire workbook or the current sheet, skip the previous step and move on to the next one.
- Select File > Print. You can also use the keyboard shortcut Ctrl + P or click the printer icon located to the right of the Redo button.
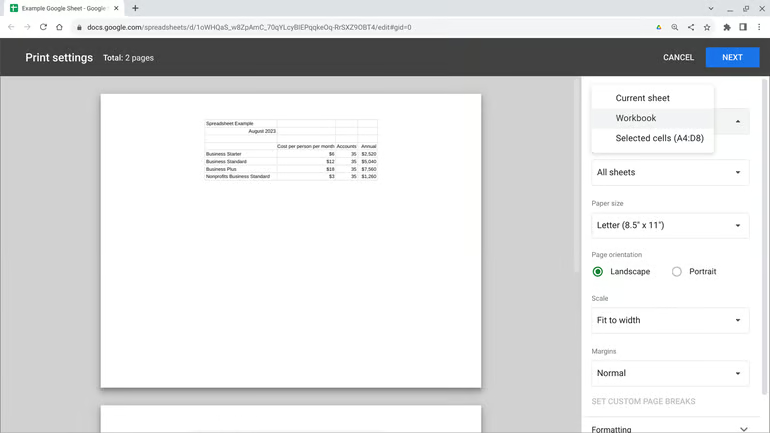
- On the print preview page, you can customize several settings, including:
- Print area: Choose between the current sheet, entire workbook, or selected cells.
- Paper size: Select a standard paper size or specify a custom size.
- Page orientation: Choose Portrait or Landscape.
- Scale: Fit the content to the width, height, or page, or set a custom percentage.
- Margins: Select normal, narrow, or wide margins, or enter custom measurements.
- Page breaks: Adjust where the content is divided across pages.
- Formatting: Show or hide gridlines and notes, change the page order, and adjust horizontal or vertical alignment.
- Headers and footers: Add information such as page numbers, the sheet title, name, date, or time.
As you modify these options, the print preview automatically updates to show how your spreadsheet will appear when printed. Adjust the settings as needed until the preview matches the layout you want (Figure B).
Figure B
- Click Next in the upper-right corner of the print preview screen.
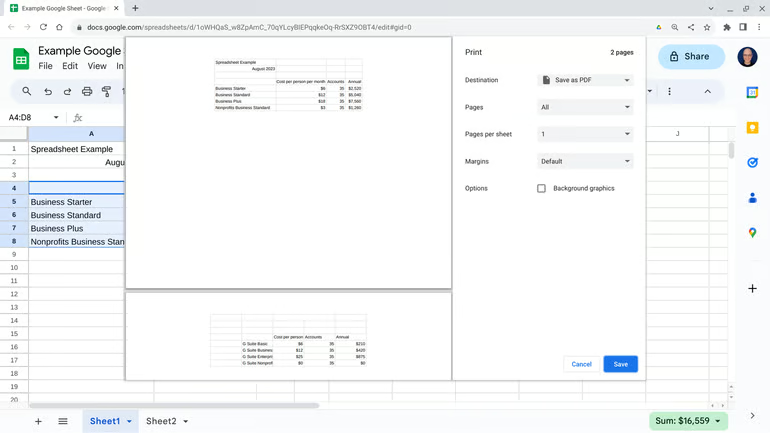
- Adjust any of the following options based on your preferences:
- Destination: Choose a connected printer, or select Save as PDF or Save to Google Drive as PDF.
- Pages: Print all pages or enter a specific range of pages.
- Pages per sheet: Choose from 1, 2, 4, 6, 9, or 16 pages per sheet.
- Margins: Select default, none, minimum, or custom margins.
- Background graphics: Enable this option if you want background graphics included in the printout.
- Select Print or Save, depending on the destination and settings available on your system (Figure C). In some cases, you may choose to save the spreadsheet as a PDF first and then open the PDF file to print it.
Figure C
How Do I Print Header Rows on Every Google Sheets Page?
Freezing header rows helps keep a Google Sheet easier to navigate, particularly when working with large datasets that span many rows. By keeping the headers visible, you can quickly identify each column without having to scroll back to the top or move between pages.
See also: Explore these Google Docs tips for advanced users.
To print the header rows on every page in the browser version of Google Sheets, follow these steps:
- Open the Google Sheets spreadsheet you want to print.
- Select View > Freeze, then choose the header row option, which is usually 1 row. This keeps the top row visible as you scroll through the spreadsheet. Depending on where your cursor is positioned, you may also see additional options for freezing multiple rows.
- Click File in the upper-left corner, then select Print. This opens the Print Preview screen, where you can see how the spreadsheet will look on paper.
- Select Headers & footers from the right-hand panel.
- Scroll down and enable Repeat frozen rows.
You can repeat multiple rows at the top of each printed page by freezing additional rows through the View > Freeze menu. You can also add page numbers by selecting Edit custom fields and choosing the appropriate option.
How Do I Change Print Margins in Google Sheets?
Margins are the blank spaces between your spreadsheet content and the edges of the printed page. Google Sheets lets you adjust these margins to control how much content appears on each page.
See also: Learn how to change header margins in Microsoft Word.
The default margin settings are suitable for most situations, but adjusting them can help improve the appearance and layout of your spreadsheet. You can also change the scaling options to control how the content fits on the printed pages.
To access the Margin and Scale settings, select File > Print.
Margin Settings
- Normal: Uses the default margin size.
- Wide: Adds more white space around the page edges, leaving less room for spreadsheet content.
- Narrow: Reduces the margins, allowing more content to fit on each page and potentially reducing the number of printed pages.
- Custom numbers: Lets you enter specific margin measurements according to your requirements.
Scale Settings
- Normal: Uses the default scaling.
- Fit to width: Adjusts the spreadsheet so all columns fit on a single page. This works well when your sheet contains many rows but only a few columns.
- Fit to height: Scales the content so all rows fit on one page. This can be useful when you have many columns but relatively few rows.
- Fit to page: Shrinks the selected content or entire worksheet to fit on a single page. This option can work well for smaller datasets.
- Custom numbers: Allows you to enter a specific scaling percentage for more precise control over the printed output.
How to Print From the Google Sheets App
You can also print spreadsheets directly from the Google Sheets mobile app on Android and iOS devices.
- On Android, tap the three-vertical-dot menu in the upper-right corner. On iOS, tap the three-horizontal-dot menu in the upper-right corner (Figure D).
Figure D
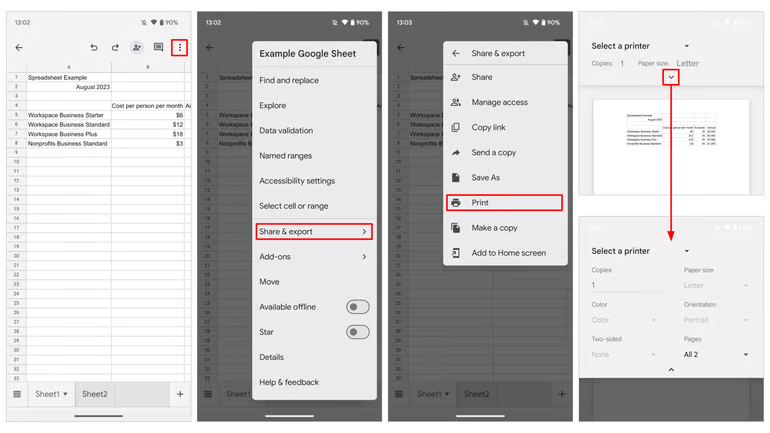
- Tap Share & export.
- Select Print.
- Choose your printer and specify the number of copies you want to print.
Depending on your device, operating system, and printer, additional printing options may be available. On Android, for example, you can tap the down arrow to expand the available settings. These may include paper size, page orientation, selected pages, color or black-and-white printing, and double-sided printing.
How to Modify Google Sheets Mobile App Print Options
The Google Sheets mobile app on Android, iOS, and iPadOS provides fewer printing controls than the desktop browser version. For example, the mobile app does not provide the same level of control over selected print ranges.
On Android, the Google Sheets app may allow you to adjust the following options:
- Device: Choose a printer or save the spreadsheet as a PDF.
- Number of copies: Specify how many copies you want.
- Color: Choose between color and black-and-white printing.
- Two-sided: Enable double-sided printing when supported by your printer.
- Paper size: Select an available paper size if supported.
- Orientation: Choose portrait or landscape mode.
- Pages: Specify which pages you want to print.
Learning Resources for Google Sheets Users
Google Sheets includes many simple but useful features, while shortcuts and advanced techniques can make a bigger difference when working on more complex projects. In some cases, you may not need to print your spreadsheet at all, particularly if you can use Google Sheets as a data source for mail merges in Gmail.
Frequently Asked Questions
How do I set a specific print area in Google Sheets?
Select the cells you want to print, then go to File > Print and choose Selected cells under the Print settings.
Can I print the entire Google Sheets workbook?
Yes. Open the print settings and select Workbook to print all sheets included in the spreadsheet.
How can I repeat header rows on every printed page?
First, freeze the rows you want to repeat using View > Freeze. Then open the print settings, select Headers & footers, and enable Repeat frozen rows.
Can I change the margins when printing Google Sheets?
Yes. In the print settings, open the Margins menu and choose Normal, Narrow, Wide, or Custom numbers to set your preferred margins.
Can I print a selected range from the Google Sheets mobile app?
The mobile app offers fewer print controls than the desktop browser version, and selected-cell printing may not be available. For precise print-area control, use Google Sheets in a desktop browser.
Conclusion
Setting a print area in Google Sheets gives you better control over how your spreadsheet appears on paper or as a PDF. Whether you need to print selected cells, an entire sheet, or a complete workbook, Google Sheets provides options for adjusting margins, scaling, orientation, headers, and page layout. Freezing and repeating header rows can also make multi-page spreadsheets much easier to read. For the most detailed printing controls, the desktop browser version is the best option, while the mobile app provides essential printing features for quick tasks.
